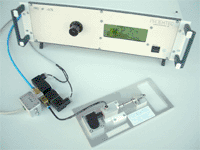
The pressure controller with leakage measurement and volume detection EPKdP was developed for a fast approaching of pressure levels with a simultaneous leakage test of the specimen. The EPKdP consists of an electro pneumatical calibration device (EPK) and a leakage test unit (PROdP).
The picture shows the front side of a leakage test unit PROdP with the corresponding measuring head and a prototype of a specimen adaptor.
Tasks:
For the production line of a manufacturer of pressure sensors a unit had to be developed that should be able to perform a final test, not only with a checking of the output signal of the sensor, but as well as with a test of the leakage. For the timing (cycle time) 5 seconds were defined for all testing steps in complete, including the test specimen handling.
Unit concept:
To meet the requirements for the short cycle time, we used a combined unit (EPKdP) – consisting of an EPK (electro pneumatic calibration unit) and a PROdP (leakage tester) with an extension for a very quick pressure approaching.
The pressure levels are monitored by alternate and quick activating of prepared volumes. During the activating and cutting-off of pressure the dynamical characteristic curve monitioring and the leakage measurement of the specimen are recorded, further also volume differences caused by compensation can be recorded by the volume detection.
The supply voltage and the output signal of the specimen are generated, measured and further tested by an electrical test.
Leakage measurement:
With the integrated leakage test (measuring device of the series PROdP) in the calibration unit (EPK) the whole test including the determination of the specimen volume takes less than 3 seconds. There is no calming time necassary. Due to the volume determination, different specimen can be distinguished automatically and the loss of parts ( e.g. plugs) can be noticed.
The leakage test can be performed either in a range with over pressure or with vacuum and realizes the measurement of the leakage, when operated with air, in the range of less than 1 ml/min up to a several hundred ml/min. The measured results are independent from the specimen volume. This avoids any mistakes caused by mounted specimen with a missing pneumatical connection.
With multiple parallel testing it was able to extend the sample set up to 3.000 specimen per hour.
The high speed of the measurement allows a better evaluation of the different specimen. PROEMTEC supported the customer with own experts concerning the evaluation and the optimizing of the unit.
A special advantage is the easy calibration of the measurement device. Therefore standard test leaks are sufficient and can be delivered by PROEMTEC. The calibration can be carried out by placing the test leak instead of the specimen and by activating the calibration mode.
Software:
For operating the unit a specific software with data base connection (management of specimen data), developed by PROEMTEC, was used. Requirements for the program were not only the specimen administration but also the documentation and evaluation (MSA) of the specimen results, the simplification of the calibration procedures, as well as the possibility for self- diagnosis and the connectivity to consisting PLCs.
To fulfil these requirements, the following features, techniques and protocols were used:
- SQL-Database which includes the detailed specimen definitions and which allows also to add further parameters for new specimen types through the operator
- XML-Structures for generating the testing reports/ protocols
- Network connection/ operation allow a central data management and a remote diagnostic and partly a remote operation of the unit
- RS232-SPS-Protocol with error detection and extended error detection functionality
- CAN, USB and TCP/IP interfaces
During the developement we gave preferences to open standards (opensource) and to the building with © LabView. The advantage is the maintainabilty of many program components through experts on customers` side (e.g. the digital communication with the specimen).
Summary:
- Test medium are gaseous, non- aggressive and non- flammable mediums, in this case dry air, but also nitrogen is possible
- Measuring range (here) 0 to 5 bar absolute, others on requirement
- Mesasuring range leakage: 0,5 to 20 Nml/min, others on requirement
- Accuracy of the system: pressure ±0,02% full scale, leakage typical 5% full scale in a temperature range of 15 to30°C
- Operating range 0 to 50°C
- Very short measuring time
- Volume characterization
- Pressure curve anlaysis
Please contact us for further information.
